


Have you seen the Netflix series The Sandman yet? It’s a beautiful adaptation of Neil Gaiman’s comic series, (not to be confused with the series Lucifer). I fell in love with Gwendoline Christie as Lucifer and just HAD to recreate one of their looks. Read on to see how I created the WINGS!
Creating the Wings
Recreating these wings was VERY challenging! I had several criteria for this part of the project:
No feathers! These appear to be bat-like membraneous wings
They must be created with EVA Foam
No PVC. Armature wire only.
They must fit inside a suitcase of some kind for travel
They must be lightweight
They must be able to be repositioned
I learned a lot of new things and definitely leveled up my tailoring and fabrication game with the amount of patterning and precision needed to pay homage to the gorgeous design by Giles Deacon, who collaborated closely with Gwendoline to create stunning, beautiful silhouettes for this character. Check out this article to read about the process and see the sketches!


Starting with a Study
One of the first things I did was make a small study of the wings so I could better understand how I could tackle the build, and so I could have an idea of what techniques I could use to get the membrane effect I desired. I made this study with floral wire, masking tape and an old action figure (yes, that’s Hela). I had to remove her head because she had very long hair. Along the way somehow her arm fell off as well. Sorry Hela!

Making the Frame
After making the study, my idea was to utilize thick armature wire and quality 2mm EVA foam. In the end I used about 35 feet of 1/4” armature wire to create the frame. It’s incredibly strong yet flexible metal wire that is extremely lightweight.
In the photo below you’ll notice that the mannequin torso is completely covered in masking tape. I did this to create temporatry masking tape pockets that the wire could slide in and out of, much like I was planning on doing with a corset later on. This allowed me to remove the wings as I needed during this fabrication process.
You will also notice that I had to add some support at the base to prevent the weight of the wire from bending the wings outward. No big deal, this is all part of the process!

Next I popped one of them into my husband’s photography travel bag (i.e. hard shell golf bag). These bags are super handy and will protect my precious wings when I travel. The wing frame just barely fit, so I knew I’d need to trim them down a little at some point.

I continued to add layers of armature wire to provide more support where needed - mostly at the base and where the structure extends from the base up to the tips. I secured them with masking tape.

As I added more wire and more tape, the additional weight started making the wings sag. I remembered that I had a little bit of sintra left from a prior version of these wings that I attempted months before (it was a backplate, but it ended up being too bulky under the jacket, so it’s being saved for a future project). Sintra is a thermoplastic and is extremely lightweight and strong. I made a cardboard template, cut out the sintra with a scroll saw and used hot glue to secure it to the masking tape-covered armature wire.
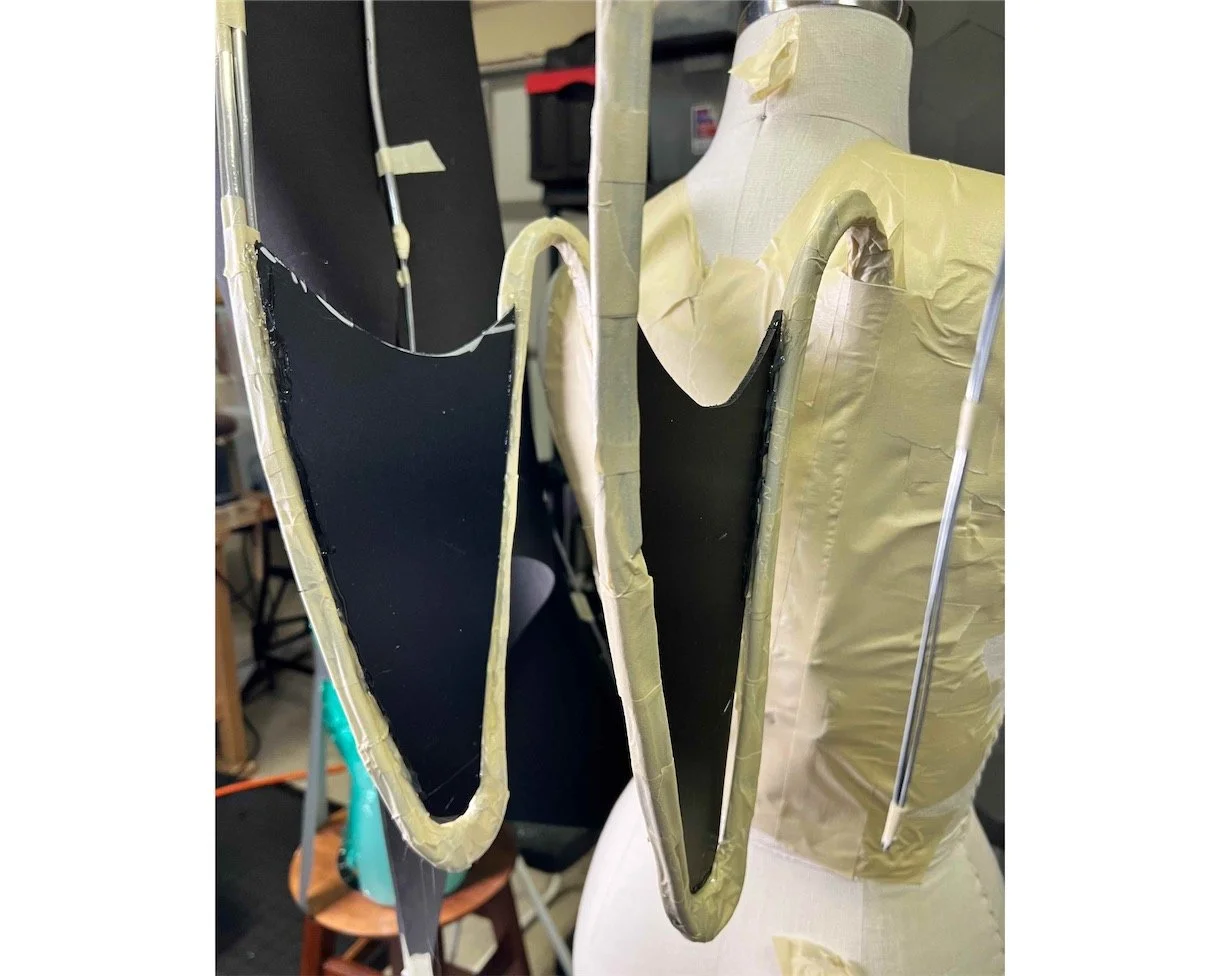
Once that was done, I discovered that not a whole lot sticks to armature wire so I covered all of the wire with masking tape.

Covering the Frame with EVA Foam
Next I began adding layers of EVA foam to the base and the main support “finger” - (did you know that these structures on a bat are actually fingers? How cool!). This additive process took quite a while. I used contact cement to glue everything together because I needed to sand it all down eventually. You can’t sand hot glue and I didn’t want to use expanding foam or any other kind of foam. This structure needed to be super sturdy - this is the place where the MOST stress will be applied when handling the wings, and pink styrofoam isn’t going to make sense here. Neither would pool noodles.

More chunks of EVA foam were added in key places. I had some foam bevels and half rounds that were perfect for adding symmetrical bulk in these areas.
Once I thought I had enough material on each section that needed a little more bulk, I started to carve away the material. I had a lot of fun during this part using my Dremel and rotary shaft to create the shoulders, elbows and curves of each wing base.


To add joints, I attached strips of 4mm EVA foam in the places where it felt like they should go. Then I rounded them down a little bit to make them look like they were smooth. The front-facing side was rounded, and the back-facing side was flattened for wing attachment (later).

Next I needed to cover the masking taped armature wires and knuckles with 2m EVA foam. To do this, I applied two layers of contact cement to a flat strip of 2mm EVA foam and the wires. I usually apply 2 layers for the best bond possible with the least amount of glue and least amount of time needed (all of this is in my book, by the way - check it out if you want to learn more about working with EVA foam!).

I also created this reel to help illustrate how I did this step:

Next I slowly attached each strip to each wire. Once the strips were in place I trimmed the excess to make it easier to sand in the next step.

This is what they looked like when they were all in place. The fingers each have different sizes (they are essentially knuckles, which would normally be different sizes in nature).


Next I referred back to the anatomy of actual bats to get inspiration for joints! Small details like this can really make your costumes feel that much more accurate, plus BAT WINGS ARE CUTE so I wanted mine to have little skeletons. It helps that I’ve been working in the medical imaging field for almost two decades.. bones are my jam!
More EVA foam was added in symmetrical sections to make carving a lot easier later.

The combination of Creature Cast and Flat Black Angelus leather paint was a perfect accident of a combination. I really lucked out with this result! Thank you, universe!

All done! Here’s a few videos of the finished result! These are Instagram reels, so if they won’t load, head over to my Instagram page to see them.

Next I sanded each EVA foam-wrapped wire so the back-facing side was flatter. This flat side is what the wing sections will attach to, and having a flat edge will make the connection look better and will be more secure. I started with this sanding tool, but then switched back to my Dremel with the flex shaft. My hands are small and needed the additional control.

Once those were done, I sanded down the main “phalange”. This one was going to be completely skinned with EVA foam, so I wanted to add a slight taper from the base to the tip to make it look nicer and more natural.

I probably spent several days sanding these down. The amount of debris floating around in the air was getting into my eyes so I added this face shield. It was an eye-saver! highly recommend having one of these around if you’re doing a lot of sanding. I have a shop vac that is usually set up to capture most of the debris, but I couldn’t always use it for this project.

Making the Membranes
Looking good! All done with sanding and ready to pattern the membranes. Full disclosure, I did this step already WAY at the beginning of the project. I didn’t include those images because I didn’t want to confuse anyone with that failed process. To make a long story short, my mockup didn’t work for structural reasons, so I needed to re-pattern.

One thing I didn’t do when I patterned my mockup was straighten out the wing frame pieces. Once you screw something up like this the first time, the second time is a breeze and makes much more sense.

Next I traced the new wing pattern to 2mm EVA foam. I actually ran out of foam and had to use part of my mockup.

Attaching the Membranes
Once they were cut out, I applied two layers of contact cement to each “phalange” (on the flat side that I sanded down earlier). I also added two layers of contact cement to the edges of each wing. Once they were tacky I attached the wing to the phalanges starting from the bottom and moving to the top. I intentionally cut the EVA wing sections a little too long just in case I needed more material at the top of the wings.

One down, several more to go! This took such a long time. I had to repeat this step 5 times on each wing. I didn’t attach the wings to the outermost and innermost phalanges because I wanted to wrap them carefully (the next step).

Once the wing sections were glued in place I could confidently wrap the large innermost phalange with EVA foam. This was so I could have a seamless appearance and NO SANDING. I had enough sanding at this point, so wrapping was ideal for this part. It was tricky and I had to take my time but it came out well.


Skinning the Rough Spots
Getting there! Next I skinned the shoulder and the elbow pieces with 2mm EVA foam and glued them in place. This was all to avoid sanding. I DID have a few spots that needed to be filled, so there was minimal sanding needed, but not too much.

The membranes are all attached and they look great! I can articulate the wing pretty well, which is great for packing for travel and for photoshoots.

Shaping the EVA Foam Wings
So one of the big reasons I wanted to use EVA foam for this build was so that I could SHAPE the material and make it more dynamic. To shape EVA foam, I used a heat gun and a round metal clay working tool to gently coax the foam into a rounded shape. This really added a beautiful form on the membranes and made each section that much more lifelike. (Heat forming is also covered in my book!)

Making Removable “Thumbs”
Next I needed to create removable “thumbs” for the tip of each wing. I used two EVA foam cone shapes from TNT Cosplay Supply and carved a couple of foam sheets glued together to create the overall sleeve shape.

I used my Dremel to carve away the inner part of the cone shapes and to sand down the edges of the sleeve.


Next I added foam clay to each thumb to give them more dimension and interest. I also needed to smooth down a few edges with Gap Filla. Once everything had cured (about 24 hours), I sanded and applied a layer of Hexflex. Hexflex is an acrylic primer AND base coat - again, check out my book for more products like this and information about using HexFlex to save time on your projects!


Priming and Painting the Wings
Next I brushed a layer of Creature Cast Super-Flex on each wing.
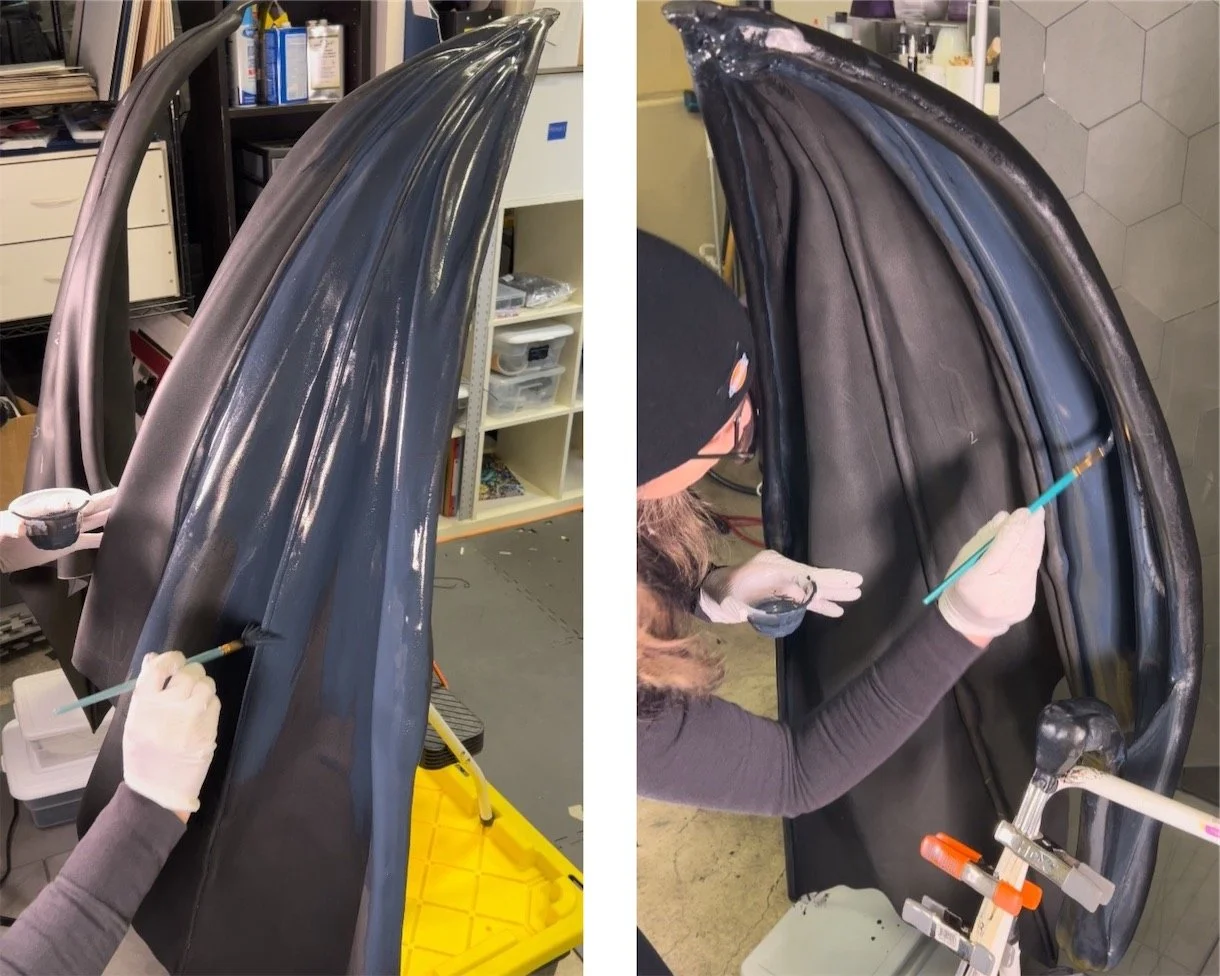
The Creature Cast is a great primer that can actually add strength to EVA foam. Each layer of Creature Cast will add a little bit of rigidity. When it dried, I wasn’t happy with the shine so I found some Angelus leather paint in flat black, which dulled the shine for a beautiful, velvety black!
If you are thinking about trying Creature Cast, please PLEASE do your research first. Their website is very handy and helpful.


