

Prop EVA Foam Axe: A Step-by-Step Project!

This little prop axe packs a big punch! This is an example of what your project could look like after painting. Read all directions before starting this project.
Build along with me as I walk you step-by-step through this cool prop Axe using EVA Foam. This project will take about 2 hours, and then you can seal and paint!
You’ll need my Mini Axe Pattern to make this project. You can also download the PDF version of these instructions here.
EQUIPMENT NEEDED:
Rotary tool
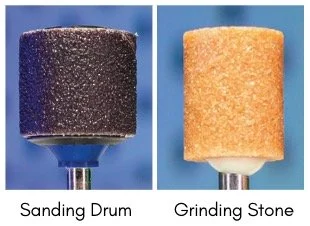
Sanding Drum Attachment for Rotary Tool
Grinding Stone Attachment for Rotary Tool
Heat Gun
Hot Glue Gun and sticks
LINKS:
Axe Pattern: https://www.downencreativestudios.com/shop/
Equipment: https://www.amazon.com/shop/downen_creative_studios/ (Amazon Afilliate)
EVA foam: https://coscomcosplaysupplies.com/
My EVA Foam tutorial book "Cosplayer's Ultimate Guide to EVA Foam": https://www.downencreativestudios.com/shop/books
Enjoy this easy project and thank you for crafting with me!
Before You Begin: Gather Materials and Tools
For this project, you’ll need the following. Print the pattern and transfer the shapes to EVA foam as directed on the pattern:
Axe pattern, printed
(2) lengths of 20mm diameter 1/2 round EVA foam, each 13" long
2 flat bamboo sticks or similar, 13" long
6"x9" of 10mm EVA 60 or 70 Foam
5" x 6" or 2mm EVA 38 Foam
1" x 2" 4mm EVA 38 Foam
Hot glue
CA glue or superglue

Step 1: Attach the Bamboo to the Dowels
Attach the bamboo sticks (or dowels) to the flat surface of one of the EVA Foam half rounds. Be sure to position the bamboo flush along the edge of the half dowel. Next, attach the dowel halves together, taking care to align the edges. Trim the bamboo if needed.

Step 2: Add a Wood Texture to the Dowel Halves
Use a rotary tool with either the sanding drum attachment or the grinding stone attachment to create a wood texture along the dowel.

To create a wood texture, lightly move the rotary tool's accessory tip across the foam surface in a straight line using the edge of the sanding drum or grinding stone to create grooves and texture.
Once the wood texture is complete, sand down the ends of the dowel if needed to make them flat.
Step 3: Sand the Blade Edges
Draw a guideline about 15mm from the edge of both blades, and along the enter of the blade edge.

Use the rotary tool and the sanding drum attachment to sand the edges down to a thin edge, being careful not to sand beyond the guidelines. Polish the sanded edges with the grinding stone.

Step 4: Sand the Blade Corners
Repeat step 3 to create a beveled edge along the small corners of the blades.

Step 5: Heat Seal the Blades and Handle
Apply heat to the blades and the handle to seal the EVA Foam. This helps with a better surface for painting. Be careful not to overheat the handle if you’ve used hot glue to attach them together. If the glue melts and comes apart, gently press the pieces together again until cooled.

Step 6: Attach the Blades to the Handle
Use hot glue to attach the blades to the top edge of the handle as shown. Hold each blade in place until the hot glue is completely cooled for best results.

Step 7: Attach the Circles to the Handle
Use hot glue to attach the small circles to the top and bottom of the handle. Gently heat seal.

Step 8: Attach the Details to the Handle
Use superglue or CA glue to attach the details to the handle. Start by applying glue to the center of the detail and pressing it in place on the handle. When the glue has cured, lift the detail edges to apply more glue and press in place. Work with small amounts of glue at little at a time for clean results.

Suggested Glue Application for the Details:
Apply a small amount of glue to the center of the upper edge of the detail as shown, and press in place on the handle. This will anchor the middle in place and will allow you to lift the edges to apply more glue a little at a time. Work slowly and sparingly with the glue to avoid getting glue on your fingers and excess glue around the edges.

Gently lift the edges of the detail to apply more glue a little at a time. Work slowly and sparingly to avoid getting glue on your fingers and excess glue around the edges.

Suggested Glue Application for the Details:
In this photo I am using scrap EVA foam as an applicator to gently and carefully apply the glue to the underside of the detail. This technique gives you the most control and will give you the best results.
Step 9: Attach the Spike
Use hot glue or superglue to attach the spike to the top of the handle.

Step 10: Heat Seal
Use a heat gun on a low setting to gently heat seal the details and the spike. Be careful not to overheat the areas where you have used hot glue. If the hot glue comes apart, gently press the pieces together again until cooled.

All Done!
Congratulations, you’ve just completed this project! Here are some tips for the next steps to finishing your new prop:

Priming, Painting & Sealing
Priming prepares the EVA foam surface for paint and is an important step for good results. EVA Foam is flexible, so if you need your project to remain flexible (like a costume you’ll wear), use flexible primers and paint. If your piece will not flex (like a prop or an object), you can use almost any kind of primer and paint. Apply primers and paint in thin layers to avoid over-filling the details.
PRIMERS: There are many products that you can use to prime: Mod Podge, Flex Bond, PVA Glue, Plasti Dip, Hexflex, Plaid FX Satin paints to name a few.
PAINTING: To avoid brush strokes, airbrushing is best. You can also use a soft bristle brush or dab with a sponge.
SEALING: Sealing paint isn't always needed, but you can opt to apply a clear sealant like Mod Podge, Flexbond, or Rustoleum (Clear) when the paint is fully dry.