
Have you seen the Netflix series The Sandman yet? It’s a beautiful adaptation of Neil Gaiman’s comic series (not to be confused with the series Lucifer). I fell in love with Gwendoline Christie as Lucifer and just HAD to recreate one of their looks. Read on to see how I created the jacket!
Creating the Jacket
Recreating this jacket was pretty challenging! I started this in the fall of 2022 and finished in mid April of 2023 with a lot of breaks and other projects in-between. There were many times when I thought I’d be able to finish the project “really quickly” to bring it to a few shows I was attending, but I wanted this to be a beautiful build knew I wouldn’t be happy if it was rushed.
I learned a lot of new things and definitely leveled up my tailoring game with the amount of patterning and precision needed to pay homage to the gorgeous design by Giles Deacon, who collaborated closely with Gwendoline to create stunning, beautiful silhouettes for this character. Check out this article to read about the process and see the sketches!


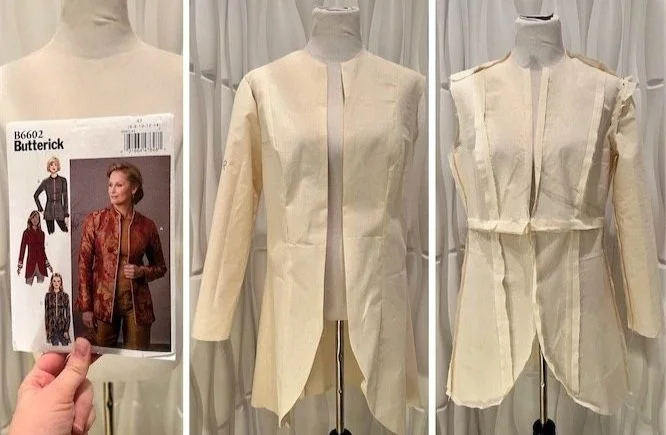
I started off with a Butterick pattern to create a basic silhouette. I then created a muslin mockup and altered the length at the waist to better fit my own body.
Next I tackled the sleeves which are REALLY COOL but also a little intimidating. Sleeves alone are a PITA for me, so this was something I really wanted to do well.
I built up a wide shoulder base on my dress form using various pads and began hacking away at my mockup. I added tape and cardboard to make the structured shapes. Then I drew pattern lines and registration marks being sure to label everything.

Next I carefully cut out all the pieces of the jacket and created a new mockup. The sleeve pattern was already giving me a headache, but I knew I needed to follow the process, not the plan. :)

I traced my new pattern to paper and transferred it all to fresh muslin. Using a long machine stitch, I assembled everything together. The sleeves were looking OK, but were a little too snug on my arm so I made a few more adjustments. And then a few more. I repeated this process a few times to get the sizing correct.

Here you can really see the difference a little adjusting and ironing can make. Look at that structure! This was beginning to look good.
Next I made a complete mockup to figure out where the wings might attach. I used an old sheet that was probably too flimsy, but it worked to help me decide that I didn’t want to use a back plate for the wings. I attempted this method thinking that I could use a plate and harness system to easily slide the wings on and off. I abandoned the idea because the plate was very visible under my jacket. This might work for a different kind of project where the plate can be built into a structured armor piece, but it wasn’t going to work for this project.


Next, I found two old XL Amazon gift bags that I had been holding on to (hoarding) for YEARS for just the right crafting occasion. The structure of this material allowed me to see how sleeves would look when I used my final PVC fabric.
This was also right about when I discovered a photo of the BACK of this jacket and to my delight (and dismay) saw box pleats I wanted to include. I could have skipped this part but there’s something about pleats that give this jacket a gorgeous feminine feel, and I knew that it would look great when I walked.
This new pattern took me a while to figure out, but I eventually landed on a circle skirt with carefully positioned pleats. I had to adjust all of the seams in the back of the jacket to match the pleats, but this is the kind of creating that I love - it’s a puzzle and I was discovering how it could come together!

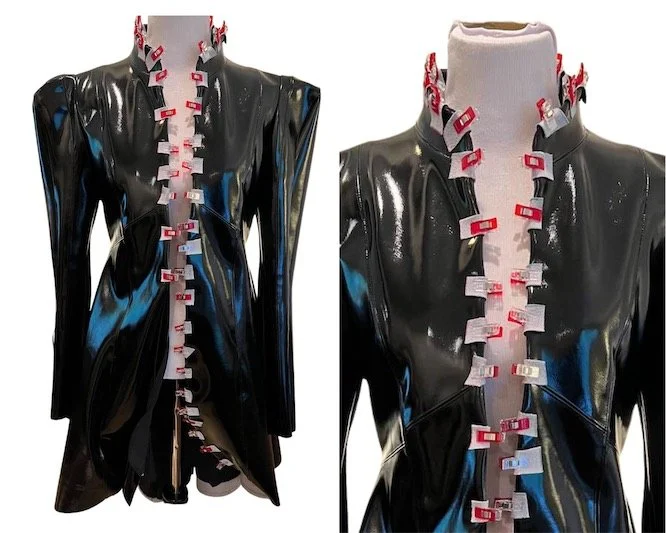
Next, I carefully took everything apart and traced the new patterns to my PVC vinyl! I used a rotary cutter to cut all of the pieces out one at a time instead of folding the fabric over to cut two at a time. This was due to the thickness of the material and also to make sure I could use every single inch of fabric with little waste. The PVC I used doesn’t have a grain so I could position the pieces in any and all directions!

Once everything was cut out I was able to sew it all together using wonder clips and a walking foot on my machine. I also used a leather needle and tear away paper to help the machine get through the sticky vinyl.

Sewing through the multi-layered pleated back panels was a big challenge for my machine, but the walking foot was a champion!
Both sleeves are now attached and the facing and lining has interfacing now. Next is determining where the front panel will need to be top stitched. This needs to happen in one seam (ideally), so I took my time making sure it was correct and lying flat.

Here you see the (mostly) completed collar and jacket! The last steps included securing the lining at the hem, hemming the cuffs, and adding the front clasp. Oh and of course adding openings on the back to fit the wings (which haven’t been made as of this point in the process). Looking really great so far!

Here’s a couple shots of attaching my homemade binding tape (another first for me) to the hem using wonder clips and a the sewing with the walking foot. After a lot of top stitching and hand sewing, the jacket was almost complete!

I added this decorative clasp at the center where the seams come together in the front. At first I thought this wouldn’t be enough but it turned out to be just perfect. It’s plastic though, so I’ll need to replace it eventually with something metal.

The next step was finishing the corset and wings so I could accurately place them against the back of the jacket to make slits where they would fit into my corset. I was very nervous about cutting into my new beautiful jacket, so I gladly left it alone for a couple weeks while I worked on the wings.
Next up:


This shot was taken by my better half Downen Photography, who had a free evening and couldn’t resist stealing my almost-complete jacket for a quick photoshoot when I was away. The most amazing WIP image ever!


Next was adding the lining, which you can see here poking out of the collar. The collar hasn’t been secured yet because I needed to ensure the lining was going to fit correctly before attaching it to the collar and the facing.

Once I attached the facing to the jacket, I needed to add a top stitch. You can’t iron PVC so topstitching is your best option. Here you can see how I used wonderclips and scrap vinyl to help hold the fabric in place without leaving marks on the PVC. Once a hole is made in PVC vinyl, it’s there forever!

I top stitched most of the seams to flatten the material underneath. If you look closely you can see a little bit of yellow tape that I put on the machine foot so I could easily guide the fabric for an even seam. Shiny black fabric is hard to see sometimes!
